Preparing a Traditional Gesso Panel
The traditional gesso I refer to here is not the same as the modern tubs of acrylic 'gesso' (the stuff that most modern canvases come ready-primed with). In fact, traditional gesso is only suitable for use on hard surfaces like wood, mdf or metal. If you apply it to canvas or any bendy surfaces, it will crack!
Why Bother with Gesso?
The answer to that is best found by trying it out for yourself. If you enjoy working on a super-smooth, luminous surface, then gesso is for you. But if you like the relative 'tooth' of canvas, then it probably isn't. One thing to be aware of is that there is a little hard work involved. Each panel needs many layers of gesso, before being sanded, so my advice is to work in bulk and gesso a whole stack of panels in a weekend if you can.
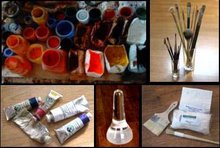
What you will Need:
- One or more solid panels (e.g. wood, mdf, masonite, copper)
- A bag of rabbit skin glue granules
- A bag of powdered whiting (aka chalk)
- A bain marie (or a pan of water with a bowl suspended in it)
- A wide, flat brush (or specialist gesso brush)

Step 1: Size the panel:
Wood surfaces require sizing with 3 coats of rabbit skin glue before applying the gesso. If the glue layers are omitted, the gesso will crack.
- Measure out 1 part rabbit skin glue granules (by volume)
- Measure out 15 parts cold water
- Cover the granules with just an inch of the cold water and leave for 30 mins to soften.
- Now add the rest of the water & warm the mixture gently in a bain marie, stirring until all of the glue is dissolved. Do not allow the mixture to boil.
- For the first coat, take a small amount of the mixture aside into a separate container and add equal parts warm water, to produce a weakened 30/1 strength glue.
- Paint the first coat onto the panel.
- When dry, paint the 2nd & 3rd coats using the stonger 15/1 glue mixture.
Note - the glue forms a jelly when cold, so it should be kept lukewarm if possible.
Step 2: Add a Muslin Layer (optional)
If wood or plywood is used for the panel there is a risk of cracking over time. To avoid this, a layer of muslin can be stuck to the surface of the panel over the 3rd layer of glue, and then another layer of glue added. This is not required when using MDF.
Step 3: Prepare the Gesso
- Measure 2 parts whiting (by volume)
- Measure 1 part of the ready-prepared warm glue mixture (at 15/1 strength)
- Before combining the two, add a small amount of warm water to the whiting, and stir to achieve a consistency similar to thick yogurt
- Slowly stir in the glue until fully incorporated, and the texture is smooth & creamy
- If the mixture starts to cools down and thicken during use, heat it gently in a bain-marie to maintain a warm temperature and a smooth consistency.
Step 4: Apply the Gesso
- Apply the first coat to the panel using a flat wide brush, or a specialist gesso brush. Use rapid, gentle strokes, spreading an even amount of gesso over the whole of the panel, right to the edges. Avoid ‘going over’ your strokes repeatedly.
- Apply the second coat when the first coat is 90% dry. Brush in the opposite direction to your first coat, using the same brisk, gentle brush strokes, so as not to disturb the layer beneath.
- Continue like this for at least 7 coats – (I often do 12 coats) allowing the panel to dry to a dull surface in between each coat, and always brushing in the opposite direction to the previous coat.
- Every now and then run the brush around the edges of the panel, to cover the sides evenly and avoid a build-up of drips.
Tips:
Keep gesso suspended over hot water to stay warm
Never touch the wet surface with your fingers
Do not try to speed-dry the panel over a heater - it will warp.
Step 5: Sand the panel
When the gesso is fully dry (ideally having been left overnight), you can sand the panel, ideally using a super-smooth 320 or 400 grit sandpaper. When finished, the panel should feel like silk!
Step 6: Seal the Panel (for oil painting)
Traditional gesso is absorbent so, before using with oils, it needs sealing with a couple of final layers of rabbit skin glue at 30/1 strength. Paint on this layer after the sanding is completed. (Note: This step is not required when working with egg tempera).
No comments:
Post a Comment